Day 2 of Week 1

Day 2 was a good day! Full of flavor…low on carbs…with a big punch of exercise!! While, I have been very proud of coming up with my own recipes, I am not above using other recipes I come across, and today was one of those days! I am super excited to share these recipes with you because they were SO yummy!! So, yummy in fact my husband even said that he was enjoying this diet…thus far. šŸ™‚

Let’s start with breakfast. “The most important meal of the day.” Yeah…yeah…yeah. This is the meal I’ve spent the vast majority of my life dodging. Well, I got up this morning and made a fairly quick breakfast for my husband and I before he left for the office. Compliments to The South Beach Diet Cookbook, this was a quick and yummy breakfast I strongly suggest you try!!

Sausage and Cheese Breakfast Cups

Ingredients:

  • 4 ounces turkey sausage or crumbled turkey bacon
  • 1/4 cup green bell pepper, diced
  • 2 tablespoons shallots, minced
  • 5 large eggs, beaten
  • 2-3 medium mushrooms, sliced
  • 1/2 cup shredded reduced-fat Cheddar cheese

Directions:

  1. Preheat oven to 350 degrees F. Coat a 6-cup nonstick muffin pan with cooking spray.
  2. In a medium nonstick skillet over medium-high heat, cook the sausage (or bacon) until about half-way cooked through, then add pepper and onion for 5 minutes, then add mushrooms and cook an additional 5 minutes, or until the sausage is no longer pink and the mushrooms are soft. Spoon the mixture evenly among muffin cups. Pour beaten eggs evenly over mixture in each muffin cup. Sprinkle with cheese.
  3. Bake for 20 minutes, or until the egg is set.

This was really good with a bit of salsa!!

I’m really excited to tell you about another South Beach Diet recipe that I made for my husband’s and my lunch. It was SO good! A bit messy, but that’s OK!

Lettuce Wrappers with Shrimp

Ingredients:

  • 1 tablespoon peanut oil
  • 1 pound large shrimp, peeled, deveined, and coarsely chopped
  • 1/2 cup finely chopped celery
  • 1/4 cup water chestnuts, chopped
  • 1 clove garlic, minced
  • 1 teaspoon finely chopped fresh ginger
  • 1 tablespoon hoisin sauce
  • 1 tablespoon light soy sauce
  • 1 tablespoon rice wine vinegar
  • 8 large leaves Boston lettuce

Directions:

  1. Heat the oil in a wok or large nonstick skillet over medium-high heat. Add the shrimp and stir-fry until they are opaque. Remove the shrimp to a bowl and set aside.
  2. Add celery, water chestnuts, garlic, and ginger, and stir-fry until the vegetables are crisp-tender.
  3. Return the shrimp to the wok and add the hoisin sauce, soy sauce, and vinegar. Cook for 1 minute, or until heated through.
  4. Evenly divide the shrimp mixture among the lettuce leaves.

Now onto the best part of my day…DINNER!! And let me just tell you that tonight’s dinner was all thanks to my new obsession, Pinterest. If you haven’t discovered the wonderful world of Pinterest, you are missing out!!! Go there…now…quickly…I’ll wait. … … … … Back yet? Good. Pretty cool, huh? For those of you have already succumbed to the addiction that is Pinterest, you may know what recipe I’m going to post. This girl, Brenda, posted on her blog, “A Farmgirl’s Dabbles“, took Garfield’s favorite food and turned it into my new favorite soup!! Yes, LASAGNA SOUP!!

“What?? Are you kidding me? That sounds gross!” said my husband and two of my daughters who went back for seconds!! Yes, it was THAT good and SUPER easy!!

Lasagna Soup

Lasagna Soup

Ingredients:

for the soup:

  • 2 teaspoon extra virgin olive oil
  • 1-1/2 pounds lean ground sirloin
  • 1 large yellow onion, diced
  • 4 garlic cloves, minced
  • 2 teaspoon dried oregano
  • 1/2 teaspoon crushed red pepper flakes
  • 2 tablespoons tomato paste
  • 1 28-oz. can crushed tomatoes
  • 2 bay leaves
  • 8 cups chicken stock
  • 8 oz. whole wheat mafalda or fusilli pasta
  • 1/2 cup finely chopped fresh basil leaves
  • salt and freshly ground black pepper, to taste

for the cheesy yum:

  • 8 ounces ricotta
  • 1/2 cup grated Parmesan cheese
  • 1/4 teaspoon salt
  • pinch of freshly ground pepper
  • 2 cup shredded mozzarella cheese

Directions:

  1. Heat olive oil in a large pot over medium heat. Add ground sirloin, breaking up into bite sized pieces, and brown for about 5 minutes. Add onions and cook until softened, about 6 minutes. Add garlic, oregano, and red pepper flakes. Cook for 1 minute. Add tomato paste and stir well to incorporate. Cook for 3 to 4 minutes, or until the tomato paste turns a rusty brown color.
  2. Add diced tomatoes, bay leaves, and chicken stock. Stir to combine. Bring to a boil and then reduce heat and simmer for 30 minutes. Add uncooked pasta and cook until al dente. Do not over cook or let soup simmer for a long period of time at this point, as the pasta will get mushy. Stir in basil and season to taste with salt and freshly ground black pepper.
  3. While the pasta is cooking, prepare the cheesy yum. In a small bowl, combine the ricotta, Parmesan, salt, and pepper.
  4. To serve, place a dollop of the cheesy yum in each soup bowl, ladle the hot soup over the cheese, and sprinkle the mozzarella on top.

I’m telling you, after eating this, I had wished I was wearing fuzzy socks and baggy sweats and was nestled under my favorite fuzzy blanket, because, this was the ultimate comfort food.

Enjoy!!


Day 1 of Week 1

It has been forever since I’ve posted anything. I know. I could go on and on about how I had surgery and things got busy with birthdays, holidays, and…yadda…yadda…yadda, but nobody really cares about all of that. If you’re anything like me, you probably really only care about two things: 1) What did you make for dinner? and 2) What is/are the recipe(s)?

Today marked Day 1 of Week 1 of my attempt to lose 20 pounds of fat. I’m not happy with the way I look and feel ever since my surgery last August. I admit it, I totally fell off the wagon and indulged…way…too…much. I am going back into the same routine I had before my surgery: eating very healthy, keeping portions under control, and working out daily.

I attempted to run 5K a week ago and nearly died. I had to take 3 breaks to walk for 3 minutes each and needless to say, I didn’t make the whole 5K. This was depressing to say the least. Prior to my surgery, I was able to run 5K in under 30 minutes without stopping for walking breaks and without really getting that winded. I want my body back to that!

Call me a control freak or just call me cruel, because in my house, if I change my diet…everyone changes their diet! I will be making breakfast, lunch and dinner for everyone. When I had my surgery, I stopped making my children’s lunches. I’ve since learned that both of them have been taking full advantage and buying as much junk as possible, especially my 11-year-old. She’s been buying an ice-cream every single day! This is exactly what prompted me to start making my children’s lunches to begin with: too much temptation for kids!!

I completely cleaned out our pantry and refrigerator of all junk food!! I’ve stocked up on fruits and veggies and other healthy snacks like yogurt!! šŸ™‚

Tonight’s dinner, while was a hit with the adults, wasn’t so much with the kiddos. I made a Bloody Mary Grilled Flank Steak with Broccoli and Cauliflower SaladĀ with Capers in Shallot Lemon VinaigretteĀ and Roasted Fingerling Potatoes.

Bloody Mary Grilled Flank Steak

Ingredients:

  • 1-2 pound Flank Steak
  • 4 cups Clamato Juice
  • 1/2 cup Vodka
  • 1/4 cup Worcestershire Sauce
  • 1/2 lime, juice of (about 1 tablespoon)
  • 1 clove garlic, minced
  • 1 teaspoon horseradish sauce
  • 1 teaspoon salt
  • 1/2 teaspoon cracked black pepper

Directions:

  1. In a large bowl, mix all ingredients except Flank Steak.
  2. Place Flank Steak into a large resealable bag and pour Bloody Mary mix over it. Remove as much air as possible and make sure steak is fully covered in mix. Place bag into the refrigerator to marinade for a minimum of 3 hours.
  3. Preheat George Foreman Grill and grill according to George’s directions. Remove from grill and let rest for at least 8 minutes. Cut at a diagonal across the grain.

The next recipe was a take on a Broccoli and Cauliflower Salad with Capers in Shallot Lemon VinaigretteĀ found on the GREAT website www.SkinnyTaste.com. I strongly suggest checking out Gina’s Skinny Recipes she has listed on there, because they are simply great! I will be using MANY of her recipes!! I had to omit the cauliflower in this one though because I seem to be the only one in my family that actually likes it. Oh well. šŸ™‚

Broccoli and Cauliflower Salad with Capers in Shallot Lemon Vinaigrette

Servings:Ā 6Ā ā€¢Ā Time:Ā 12 minutes

Ingredients:

  • 1 head broccoli
  • 1 head cauliflower
  • 2 tbsp capers

Vinaigrette:

  • Juice from 1/2 lemon (2 tbsp)
  • 3 tbsp extra virgin olive oil
  • 1 clove garlic, crushed
  • 1 small shallot, minced
  • Salt and pepper

Directions:

  1. In a small bowl,Ā whiskĀ the lemon juice, olive oil, garlic, shallot, salt and pepper.
  2. CutĀ the broccoli and cauliflower into bite size florets. Using a steamer,Ā steamĀ the vegetables for about 8 to 10 minutes.Ā RemoveĀ the vegetables and place in a large bowl.Ā TossĀ with the vinaigrette and serve.

Roasted Fingerling Potatoes

Ingredients:

  • 1 pound fingerling potatoes
  • 8 whole cloves of garlic
  • 3 tablespoons extra virgin olive oil
  • 1 tablespoon fresh thyme, chopped
  • 1 teaspoon salt
  • 1/2 teaspoon fresh cracked black pepper

Directions:

  1. Preheat oven to 375 degrees F.
  2. In a large bowl, toss all ingredients together until potatoes are covered well.
  3. Pour into a baking dish and bake for 20-30 minutes until potatoes are fork soft.

Like I said earlier, this was a major hit with the adults, but the kids weren’t thrilled with it. Then again, I kind of knew that going in. One of my girls absolutely, whole-hearted hates broccoli. Just the mention of the word makes her gag. I’ve tried every-which-way to get her to eat them, but all for not. My middle child seems to have the same distaste for fingerling potatoes. And the nearly four-year-old has been exercising her independence and control over dinner and tonight was a night that she decided she didn’t want what I made for everyone else, she wanted her very own dinner of cooked elbow pasta in V-8 juice (thanks Stephenie for that simple recipe, she loves it!).

I hope you and your adults like this meal as much as my adult and me!! šŸ™‚

Bon appetit!!

Not Your Mama’s Shepherd’s Pie!!

Sirloin Shepherd's Pie

I have a new hero in the cooking world and her name is Nadia G. This chic is the hostess of the Cooking Channel show “Bitchin’ Kitchen.” Straight from the Cooking Channel bio: “She’s young, funny and can cook up a storm in three-inch cherry stiletto heels.” …and it’s so true!

While flipping through channels, my husband and I happened upon her show. I admit, at first, I couldn’t stand it. Too many gimmicks and corny antics, but there was something about her show that kept me coming back…it was her food. She completely captured my heart…and stomach…with her Sirloin Shepherd’s Pie. It’s so simple, but yet, so luscious. It packs such amazing flavor in every single bite!

To simplify the recipe, I’ve broken it down into three separate sections that come together at the end. Don’t let the fact that there three sections concern you! They’re super easy and can be done a the same time.

Sirloin Shepherd’s Pie

Ingredients:

Potato Topping

  • 2 sweet potatoes (good size), sliced into equal-size chunks
  • 2 russet potatoes (same size as sweet potatoes), sliced into equal-sized chunks
  • 1 heaping tablespoon butter
  • 1/4 cup heavy whipping cream
  • big pinch of sea salt
  • fresh ground pepper to taste

Creamed Corn Center

  • 5 cobs of corn, shucked and cleaned
  • 1 heaping tablespoon butter
  • 2/3 cup heavy whipping cream
  • 1/2 teaspoon sugar
  • pinch of sea salt
  • fresh ground pepper to taste

Meat Base

  • 3 tablespoons extra-virgin olive oil
  • 1 red onion, diced small
  • 2 pounds organic ground sirloin
  • handful of minced parsley
  • 1 tablespoon smoked paprika
  • 1/2 teaspoon cayenne pepper
  • big pinch of sea salt
  • fresh ground pepper to taste

Directions:

  1. To make the potato topping:Ā Boil the sweet potato chunks and russet potato chunksĀ in salted water until fork tender, about 15-20 minutes. StrainĀ the potatoes and transfer to a large bowl. Add the butter, heavy whipping cream, sea salt, freshly ground black pepper and mash together until smooth.
  2. To make the creamed corn center:Ā On a cutting board, cut the stalk ends of the corn cobs to make a flat surface; stand them up and shave the corn kernelsĀ from the cobs with a sharp chef’s knife. Heat skillet to medium heat and melt butter, and add the corn kernels. With the back of a butter knife, firmly scrape the cobs over a shallow plate to extractĀ as much liquid (milk) as possible and add it to the skillet. Add heavy whipping cream, salt and pepper and cook until broken down and creamy, about 25 minutes.Ā Transfer the creamed corn to a food processor and pulse 4 or 5 times until large kernels are broken down slightly.
  3. To make the meat base:Ā In a pan, heat the extra-virgin olive oilĀ over medium heat. Add the diced red onion and sautĆ© for 8 minutes. Add the ground sirloin, parsley, smoked paprika, smoked cayenne, sea salt, and freshly ground pepper to the pan. Mix and sautĆ© for 10 minutes. Turn the heat up to medium-high and saute for a few more minutes, until some crispy bits develop and the fat has been cooked off.
  4. To bring it together:Ā Evenly distribute the crisped beefĀ into the bottom of a baking dish. (I use a lasagna dish.) Cover the meat with a layer of the creamed corn. Top the pieĀ off with the sweet potato and russet potato mash. Sprinkle withĀ smoked paprika and broilĀ for a couple minutes, until edges are golden and crispy.

I’m telling you! This recipe is is a winner every time!! Enjoy! šŸ™‚


A little time consuming, but SO worth the wait!

Pork Tenderloin with Apple Bacon Stuffing, Russet and Sweet Potato Parmesan Gratin, and Sweet Creamed Corn

Tonight’s dinner had “comfort” written all over it! It may come off as intimidating or even difficult, but truly it is easy when broken down into steps. And, I will write those steps out for you…just make sure you have at least 2 to 3 hours to donate to the meal. But, believe me. This dinner, as a whole, is really worth the time put into it. šŸ™‚

Apple Bacon Stuffing

Ingredients:

  • 6 ounces bacon, sliced
  • 1 cup portabella mushrooms, diced
  • 3/4 cup onion, diced
  • 1 cup Granny Smith apples, diced
  • 1/2 cup carrots, diced
  • 1/2 cup fresh parsley, minced
  • 1 tablespoon fresh thyme, minced
  • 1 teaspoon dried rubbed sage
  • 2 cups dried breadcrumbs

Directions:

  1. In a large nonstick skillet, render bacon pieces over medium heat until crisp and brown. Remove cooked bacon pieces with a slotted spoon to drain on paper towels and leaving behind the fat in the skillet.
  2. Add mushrooms and onions to skillet and cook until vegetables are soft and have released their juices, about 8 minutes. Add carrots and apples and cook for an additional 1 minute. Add parsley, thyme, sage, and salt and pepper to taste. Cook for another 1 minute.
  3. In a large bowl, mix vegetable mixture and breadcrumbs together. Set aside.

Pork Tenderloin

Ingredients:

  • 2-3 pound pork tenderloin
  • 1/3 cup Dijon mustard
  • 1 apple, unpeeled and thinly sliced
  • Prepared Apple Bacon stuffing

Directions:

  1. Preheat oven to 400 degrees F.
  2. Cut each tenderloinĀ lengthwise halfway through and open like a book. Place between plastic wrapĀ or waxed paper. Using a meat pounder or rolling pin, pound to generous 1/4-inch thickness. Cut about 7 pieces of kitchen string into 15-inch lengths.
  3. Sprinkle meat with salt and pepper. With hands, press half of the stuffing over meat to cover surface. Roll meat up over stuffing, jelly roll style, tuck thin ends under and press firmly in place. Tie strings around roast, trimming any excess. Repeat for second tenderloin.
  4. Spread mustard all over roasts. Arrange apple slices in lengthwise row on top, sprinkle with salt and pepper. Arrange thymeĀ sprigs over top.
  5. Place in preheated 400 degree oven, reduce heat heat to 350 degree. RoastĀ for 1-1/2 hours or until meat thermometerĀ registers 160 degrees. Transfer to cutting board and cover with foil. Let stand for 10 minutes. Slice roastĀ and serve.

Russet and Sweet Potato Parmesan Gratin

Ingredients:

  • 2 tablespoons butter
  • 1-1/2 cups heavy whipping cream
  • 2 cloves garlic, minced
  • 2 sprigs fresh thyme
  • 1/2 teaspoon freshly grated nutmeg
  • 1 tablespoon smoked paprika
  • Salt and pepper
  • 3 large russet potatoes, thinly sliced
  • 3 large sweet potatoes, thinly sliced
  • 1/2 grated Parmesan cheese

Directions:

  1. Preheat oven to 350 degrees F.
  2. In a medium saucepan, heat butter, cream, garlic, thyme, nutmeg, paprika and salt and pepper.
  3. While cream is simmering, butter a 8×8 casserole dish. Place a layer of russet potatoes in an overlapping pattern and season with salt and pepper. Remove cream from heat (and remove sprigs of thyme from cream), then pour one-third over the potatoes. Top with one-third of the grated Parmesan. Make second layer of sweet potatoes, cover with one-third of the cream and Parmesan cheese. Make third layer of alternating russet and sweet potatoes, cover with remaining third of cream and Parmesan.
  4. Bake, uncovered, for 45 minutes (place along side pork tenderloin roasts).

Sweet Creamed Corn

Ingredients:

  • 4 tablespoons butter
  • Ā 5 cobs of corn
  • 1/3 cup heavy whipping cream
  • 1 teaspoon sugar

Directions:

  1. On a cutting board, cut the stalk ends of the corn cobs to make a flat surface; stand them up and shave the cornĀ from the cobs with a sharp chef’s knife. Place kernels into the bowl of a food processor and pulse 2-3 times.Ā With the back of a butter knife, firmly scrape the cobs over a shallow plate to extractĀ as much liquid (milk)Ā as possible.
  2. In a large skillet, melt butter over medium-low heat.Ā Add the chopped corn kernels and corn “milk” it to the skillet. Stir in sugar and cream.Ā Season corn lightly with salt and pepper and cook until broken down and creamy, about 30 minutes, stirring often.

The whole meal was a big success with my family and I hope the same holds true for your family. šŸ™‚

Easy school lunches they will LOVE!

I don’t know about you, but I am disgusted with most of the food that is served at my children’s schools. I decided to have lunch with my daughter late last school year at her elementary school. I brought chicken wraps but forgot drinks, which I thought would be fine as I would just purchase some milks from the school. I go through the line with my daughter only to see a huge display of Debbie Snack Cake and other sweets, bags of chips, a freezer with ice-creams (my daughter’s major weakness) and only strawberry and chocolate milk to choose from. They did have the lunch, which was pizza being served, but I’m surprised any of the kids would want it after being tempted with every fattening sweet snack imaginable! I’m not saying they didn’t have anyĀ healthy choices, but they were hard to see past all of the temptations. My other daughter’s middle school isn’t much different. They have two food serving areas, “Ala Carte” and “Dine In”. Can you guess what is served “Ala Carte”? You’ve got it! Even MORE of a selection of junk than what is offered at the elementary school. Again, I’m not saying either school doesn’t serve anything healthy. I’m just saying that it is hard for a child to make the right choice when the amounts between junk and healthy are so overwhelmingly tipped in favor of the junk. And to add to the hypocrisy, the schools provided the parents with booklets and pamphlets about “Healthy Life Choices and Eating” this year at Meet the Teacher. Really??

Throw in on top of that, about the same time I visited my daughter’s school for lunch, I was really into Jamie Oliver’s Food Revelation and his fight against the Los Angeles School District. After both the experience and watching the show, I made up my mind that I would make my girls their lunches every day!

Here are several quick, easy and affordable recipes that I’ve made for my girls and you can also do for your children! I was on cloud-nine when my girls told me “My friends are so jealous of what I get for lunch everyday!” It just confirmed that they are eating healthy and really enjoying what they are eating.

Turkey, Ham & Swiss Pockets

Turkey, Ham & Swiss Pockets
Ā  Ā Prep Time: 15 minutes
Ā  Ā Bake Time: 20 minutes
Ā  Ā Makes 4 pocketsĀ 

Ingredients:

  • 1 sheet frozen puff pastry (from 17.3-ounce box) thawed
  • 4 teaspoons honey mustard
  • 4 thin slices deli turkey
  • 4 thin slices deli ham
  • 4 thin slices Swiss cheese

Directions:

  1. Preheat oven to 400 degrees F. Roll out puff pastry on lightly floured surface to 12-inch square. Cut into four 6-inch squares.
  2. Spread each pastry square with 1 teaspoon mustard. Fold turkey, ham and cheese into triangles. Layer triangles of turkey, ham, and cheese on one-half of each pastry square. Fold pastry over filling; press edges with a fork to seal. Place on a baking sheet.
  3. Bake pockets until golden, about 20 minutes. Serve warm pocket sandwiches with additional mustard, if desired.

Pizza Swirls

Pizza Swirls
Ā  Ā Prep Time: 10 minutes
Ā  Ā Bake Time: 15 minutes
Ā  Ā Makes 10 rolls

Ingredients:

  • 1 sheet of PillsburyĀ Crescent Recipe CreationsĀ Seamless DoughĀ Sheet
  • 1/4 cup prepared pizza sauce (I used left overs from my own recipe)
  • 1/2 cup shredded Mozzarella cheese
  • 2 tablespoons finely chopped pepperoni
  • 1 tablespoon olive oil
  • 2 tablespoons grated Parmesan cheese

Directions:

  1. Preheat oven to 450 degrees F. Generously coat a rimmed baking sheet with cooking spray.
  2. Roll out dough sheet to a 10-inch square on a lightly floured surface. Spread pizza sauce over dough. Reserve 2 tablespoons mozzarella; sprinkle remaining mozzarella over sauce. Top with pepperoni. Roll dough jelly-roll style to enclose filling.
  3. Cut roll crosswise into 10 slices (about 1-inch thick). Place slices, cut side down, on prepared baking sheet; brush tops with oil. Sprinkle with Parmesan and reserved mozzarella.
  4. Bake until golden brown, about 15 minutes. Serve warm.

Mozzarella Tomato Spedini

Mozzarella Tomato Spedini

Prep Time: 10 minutes
Ā  Ā Bake Time: 8 minutes
Ā  Ā Makes 4 sandwiches

Ingredients:

  • 8 thin slices crusty Italian bread
  • 8 thin slices mozzarella cheese, cut in half
  • 4 thin slices prosciutto or smoked ham
  • 8 thin slices tomato, optional
  • 2 large eggs
  • 1/2 cup all-purpose flour
  • 1/4 cup grated Parmesan cheese
  • Marinara sauce

Directions:

  1. Preheat oven to 400 degrees F. Coat a baking sheet with cooking spray. Place 4 slices of bread on a cutting board. Top each with 2 slices of mozzarella, 1 slice of prosciutto (or ham) and 2 slices of tomato (optional). Cover tomato slices with 2 more slices of mozzarella. Top each sandwich with remaining bread slices.
  2. Cut each sandwich into halves. Beat eggs in a shallow bowl. Mix flour and Parmesan in another shallow. Dip both sides of each sandwich half briefly in egg.
  3. Coat each sandwich half lightly with flour mixture. Place one prepared baking sheets. Spray each sandwich lightly with cooking spray.
  4. Bake spedini for 4 minutes. Turn spedini over; bake until both sides are golden, about 4 minutes longer. Serve warm with marinara sauce for dipping.

Ham and Cheese Breadwiches

Ham and Cheese Breadwiches

Ā  Ā Prep Time: 5 minutes
Ā  Ā Bake Time: 14-20 minutes
Makes 6 sandwichesĀ 

Ingredients:

  • 1 package (10 ounces) refrigerated crescent rolls
  • 1 tablespoon Dijon-style mustard
  • 4 ounces thinly sliced deli-style ham
  • 1 cup (4 ounces) shredded Cheddar cheese
  • 1 egg, beaten
  • 1 teaspoon sesame seeds
  • 1 teaspoons caraway seeds

Directions:

  1. Preheat oven to 375 degrees F. Unroll crescent roll dough on an ungreased baking sheet. Pinch perforated edges together to make 1 solid sheet of dough.
  2. Ā Spread mustard on dough. Arrange ham on mustard, then sprinkle with Cheddar cheese.
  3. Bring long edges up over the filling and pinch ends to seal the center seam. Brush with beaten egg and top with sesame and caraway seeds.
  4. Bake until bread is golden, 14-20 minutes. Remove from oven and cool on a wire rack for 1 minute. Cut bread into 6 sandwiches to serve.

Italian Triangle Snacks

Italian Triangle Snacks
Prep Time: 15 minutes
Ā  Ā Bake Time: 15-20 minutes
Ā  Ā Makes 10-12 servings

Ingredients:

  • 1 can (8-ounces) refrigerated crescent dinner rolls
  • 1 package (3-ounces) cream cheese softened
  • 3/4 cup chopped, seeded tomato (about 1 large in size)
  • 1/2 cup sliced, pitted black olives
  • 1/3 cup sliced green onions
  • 2 tablespoons chopped fresh basil
  • 3/4 cup finely shredded Italian mozzarella and Parmesan cheese blend

Directions:

  1. Preheat oven to 425 degrees F. Unroll crescent roll dough on a baking sheet. Press perforations and edges to seal, forming a 12- to 10-inch rectangle.
  2. Beat cream cheese in a small bowl with an electric mixer on medium speed until smooth, about 1 minute. Spread cream cheese evenly on dough. Top cream cheese with tomato, olives, green onions and basil. Sprinkle with mozzarella-Parmesan cheese blend.
  3. Bake appetizer until crust is browned and cheese is melted, about 15-20 minutes. Transfer to a cutting board and cut into triangles.

Pizza Snack Cups

Pizza Snack Cups
Prep Time: 10 minutes
Ā  Ā Bake Time: 20 minutes
Ā  Ā Makes 10 pizza cups

Ā Ingredients:

  • 1 can (12-ounces) refrigerated biscuits (10 biscuits)
  • 1/2 pound ground beef
  • 1 jar (14 ounces) Ragu Pizza Quick Sauce
  • 1/2 cup shredded mozzarella cheese (about 2-ounces)

Directions:

  1. Preheat oven to 375 degrees F. In 12-cup muffin pan, evenly press each biscuit in bottom and up side of each cup; chill until read to fill.
  2. In 10-inch skillet, brown ground beef over medium-high heat; drain. Stir in Ragu Pizza Quick Sauce and heat through.
  3. Evenly spoon beef mixture into prepared muffin cups. Bake 15 minutes. Sprinkle with cheese and bake an additional 5 minutes or until cheese is melted and biscuits are golden. Let stand 5 minutes. Gently remove pizza cups from muffin pan and serve.

Hawaiian Crescent Rolls

Hawaiian Crescent Rolls
Prep Time: 25 minutes
Ā  Ā Bake Time: 15 minutes
Ā  Ā Serves 4

Ingredients:

  • Ā 3 ounces cream cheese, softened
  • 2 tablespoons honey, divided
  • 1 tablespoon minced green onions
  • 1 (8-count) package refrigerated crescent rolls, separated into triangles
  • 6 ounces (24 slices) thinly sliced ham
  • 1 tablespoon mustard
  • 1/4 cup mayonnaise
  • 1/4 cup crushed pineapple, drained

Directions:

  1. Preheat oven to 375 degrees F.
  2. Mix cream reese, half the honey and green onions; spread over dough triangles. Cut ham into triangles slightly larger than dough. Mix mustard, mayonnaise, remaining honey, and pineapple in a medium bowl.
  3. Layer about 4 ham triangles onto each dough triangle. Spoon some pineapple mixture on top of ham slices.
  4. Roll up crescents, starting from the wide end, to enclose filling. Place on an ungreased baking sheet, leaving space between each roll.
  5. Bake for 15 minutes or until rolls are golden brown; remove carefully from baking sheet. Serve warm.

Chicken Parmesan Hero Sandwiches

Chicken Parmesan Hero Sandwiches
Prep Time: 10 minutes
Ā  Ā Bake Time: 20 minutes
Ā  Ā Makes 4 servings

Ingredients:

  • Ā 2 large boneless, skinless chicken breast
  • 1 egg, beaten
  • 3/4 cup Italian seasoned dry bread crumbs
  • 1 cup prepared marinara sauce
  • 1 cup shredded mozzarella cheese (about 4 ounces)
  • 2 teaspoons grated Parmesan cheese
  • 4 long Italian rolls, halved lengthwise

Directions:

  1. Preheat oven to 400 degrees F. Place chicken breast into a large ziplock bag and using a meat mallet, pound chicken breasts to 1/4-inch thickness. Cut each chicken breast into half lengthwise.
  2. Dip chicken in egg, then bread crumbs, coating well.
  3. In 13×9-inch baking dish, arrange chicken. Bake uncovered for 15 minutes.
  4. Pour marinara sauce over chicken, then top with mozzarella and Parmesan cheese. Bake an additional 5 minutes or until cheese is melted and chicken is no longer pink.
  5. Arrange chicken onto rolls and top with additional sauce, if desired.

I usually pair these wonderful lunches with some fresh fruit, like an apple or orange slices, a drink and sometimes one of my sweet treats as a desert. I hope your children love these lunch alternatives as much as my children do! šŸ™‚

Apply Juice 1, Apple MacBook 0!

As you already know, I had an accident a few weeks back with a small glass of apple juice and my laptop. After two and half weeks, I finally get a call from the Gook Squad at Best Buy and low and behold, the apple juice didn’t just make the keys on my MacBook sticky, it seeped into my motherboard and completely fried it!! Luckily, I had purchased the 3-year warranty with accidental coverage, so the whole thing was replaced. Here’s a bit of advice, DO NOT purchase an Apple product from the Apple store! They do NOT offer any warranties; you have to ask for it specifically. Also, their warranties do not cover many things, like SPILLS!! The Best Buy warranties are great!! Where else can you get a brand new MacBook Pro replace for NO OUT OF POCKET?!?! I have nothing but good things to say about Best Buy for now on.

So, now that I have my new and approved laptop back in my life, I can get back to my wonderful world of cooking and sharing my experiences with you. Over the past 3 weeks, I’ve experimented with many recipes that have for the most part been absolute successes! I will try to get them all posted as soon as possible and get all caught up! Until then…Bon Appetit!

The Apple Juice Debacle!

Just in case you weren’t aware, laptops do NOT like apple juice!

The other night, the kiddos, James and I gathered around to watch the Bugs Bunny/Road Runner Movie. James turns to me and says he tried looking everywhere for this movie on DVD not too long ago. I happened to have my laptop sitting on my lap, as I had just finished posting a blog, so I brought up Google and did a quick search for the movie. Low and behold I found it…in DVD format…in a matter of about 3 minutes. I decided to surprise James with this allusive DVD since he had no idea I was searching for it. I reached over my head to grab my purse sitting above my chair on the bar. However in doing so, I had completely forgotten about the half-full 8-ounce glass of apple juice sitting just before it near the edge of the bar, and consequently also right above my head. I don’t believe I need to go into detail about the icy cold typhoon that befell my head, back, chair and yes, my laptop. In a panicked dash of speed, both James and I tried soaking up all of the juice from the laptop, chair and me. Everything seemed to be in working order with my laptop, until yesterday. The sticky juice had began making its appearance but it wasn’t until yesterday that it began acting like a glue to my keys. So, needless to say, my laptop is with the Geeks getting a thorough wipe down. Thus, since I am without my laptop, I will be delayed once again from posting any of my new recipes and creations. But I will continue to take photos and keep a log so I can post them the very minute I get my poor Mac back. šŸ™‚

Thanks for following me!! I shall return shortly!! šŸ™‚

On top of spaghetti….

Spaghetti with Meatballs

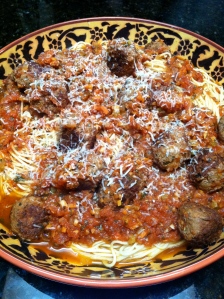
I had help in the kitchen tonight with two wonderful apprentices, Alyssa and Taylor. After I mixed together all of the ingredients, they were so eager to put their hands into the raw meat mixture to roll out little balls.Ā Not only did they have tons of fun making the meatballs with me, but they had a great sense of pride eating their creations! This recipe is only for the meatballs, and I really hope you bring your little ones into the kitchen to help you make them, like my little ones did.

The meatballs were moist and bursting with flavor! They were a great addition to the spaghetti.

Italian Meatballs

Ingredients:

  • 1-1/2 pound ground sirloin
  • 1/2 cup onion, finely diced
  • 1/4 cup plain Panko bread crumbs
  • 1/4 cup fresh parsley, minced
  • 2 large eggs
  • 3 cloves garlic, minced
  • 1 tablespoon gratedĀ Parmigiano-Reggiano cheese
  • 1 teaspoon salt and pepper
  • 1/4 cup olive oil

Directions:

  1. In a large bowl, combine beef, onion, bread crumbs, parsley, eggs, garlic, cheese, salt and pepper using your best tools: your hands.Ā Measure out rounded tablespoonful sized amounts of the meat mixture and round into little balls.
  2. Heat the oil in a large skillet over medium-high heat. Cook meatballs until golden brown on all sides, about 2-3 minutes each side.Ā Remove from oil and let drain on paper towels.

I hope you and your family have fun with this great tasting addition to your favorite Italian meal. šŸ™‚

I did it! I finally did it!!

Apple peel

Ever see the movie “Sleepless in Seattle”? It’s a favorite among us chics. There is a scene in the movie, where Sam, the widower father played by Tom Hanks, is talking to a radio psychologist about his deceased wife and describing the things that made him love his wife so much. Of the memories, he recalls how “She could peel an apple in one long, curly strip. The whole apple.” Well, ever since seeing that movie and hearing him describe that, I’ve always wanted to do the same thing. I have tried many times, but never had I successfully peeled the whole thing in one long strip. Usually, the strip would break, I’d cut it or myself…which had happened several times. Finally, I had given up and resorted to using a vegetable peeler. For years, I thought about giving it another shot, but always opted for the peeler to avoid disappointment. While making my Whole-Wheat Apple Cinnamon Pancakes, I, as usual, grabbed the vegetable peeler to begin peeling the apple when I got the sudden urge to try using a knife. I put the peeler down nearby, already giving in to the idea that I will fail and need to return to it’s reliability. I started slowly at the top of the apple, concentrating on not making the slices too narrow or too think/thin, and before I knew it, I was peeling the very bottom of the apple until…the whole apple had been peeled! I screamed with such proud excitement at my success!! I even ran into the bedroom where my husband was still slumbering and woke him up with my screeching enthusiasm. I’m sure he questioned how that was even remotely important enough to awake him, but I didn’t care. I had to share it with him. I even posted my success on Facebook. A nearly life long dream to be like the fictional wife from a chic-flick had finally came true. And how ironic that reach my goal when I too am a wife with children? Let’s just hope that I do not end up the way Mrs. Baldwin does. But if I do, I can at least go knowing that I had succeeded in a small but elusive goal. šŸ™‚

They may be mini, but they pack BIG taste!

Mini Lobster Rolls

Sunday lunches in my home usually consist of turkey and cheese sandwiches or some other kind of sandwich. See, Sunday is our lazy day before the start of a new week. You can often find us sitting in our reclining chairs, like some old couple, with our eyes glued to some kind of sporting event or sneaking in a small nap. I came across this beachy treat while reading an issue of Gourmet Live. It is a super easy dish with lots of tangy and creamy flavor. Because of the ease of the meal, I had decided that it would fit in nicely with our lazy Sunday routine. I simply paired it up with some of my favorite Garden Salsa Sun Chips, which I believe was a nice combination. Although, in my opinion, Garden Salsa Sun Chips make a great addition to just about any meal! šŸ˜‰ But enough with the shameless plug, on to the recipe of this great little seafood treat!!

Mini Lobster-Shrimp Rolls

Ingredients:

  • 1/2 pound cooked lobster tail, finely chopped
  • 1/2 pound cooked shrimp, finely chopped
  • 1/4 mayonnaise
  • 1/2 tablespoon fresh lemon juice, about half of a juicy lemon
  • 1 tablespoon chopped fresh dill
  • 2 teaspoons chopped fresh chive
  • 1/2 teaspoon grated lemon zest
  • 1/4 teaspoon salt and pepper, each
  • 10 soft dinner rolls

Directions:

  1. In a medium bowl, stir together all ingredients until just combined. (Mixture can be refrigerated, covered, for up to 12 hours before serving.)
  2. Cut into rolls on the side to split them from top to bottom, but do not cut all the way through. Fill each with about 1 rounded tablespoon of seafood.

Chef’s Note: For added intensity, add a dash of Old Bay seasoning to the top of each separate sandwich.

Because of the simplicity of the dish and the small size, this would make a great party food. I would suggest keeping the seafood mixture in a chilled bowl and the rolls separated and have guests contract their own sandwiches. Enjoy!! šŸ™‚